You Know I Had to Do It to Em Half Life

I Have No Mouth, and I Must Scream
This item has been removed from the community because it violates Steam Community & Content Guidelines. It is only visible to yous. If yous believe your detail has been removed by mistake, please contact Steam Support.
This item is incompatible with I Take No Oral cavity, and I Must Scream. Please meet the instructions folio for reasons why this item might not work inside I Have No Mouth, and I Must Scream.
Electric current visibility: Hidden
This particular will only be visible to yous, admins, and anyone marked as a creator.
Current visibility: Friends-only
This item will only be visible in searches to you, your friends, and admins.

330 ratings

I Accept No Rima oris, and I Must Scream - A Complete Guide
A consummate and spoiler-free guide to finishing the game in every possible scenario.
Introduction
Common cold war paranoia and hysteria dominated the civilized world in 1 class or some other from the Russian Revolution in 1917 to the crumbling of the Berlin wall in 1989. For nearly of the 20th century the human race lived in a land of repressed panic and diminution of personal freedoms. But all that ended and the threat of nuclear holocaust blew away as lightly as the tabloids that fueled the paranoia. No more threat of war, and the world moved forrad into a new historic period of thousands of brushfire wars in countries no one had ever even heard of. Safe at terminal. In a grunter's optics. What none of united states knew was that during the years 1945 to 1989, the three great superpowers had set up in move secret projects that would allow vast subterranean complexes of cocky-repairing computers to wage a global war too complex for mere homo brains to oversee.
The Chinese computer was sunk in the frozen Manchurian steppes. Five miles downwardly, protected from the heat of the Earth'southward motel core. The Russian mechanism in all its awesome complexity went to the deep well beneath the Urals. Half dozen point three miles deep, far from the prying eyes of U2 flyovers and tectonic scans. The American computer, co-sponsored past Keen United kingdom and Israel and other "interested" nations, named the Allied Mastercomputer (or AM, for brusque), was subconscious below the Rockies. Five point 6 miles directly down, under the weight of the world.
And they were all put in operative mode, and were fed everything there was to know about the human race, from our showtime murder by crushing the skull of a beau pithecanthropoid with a bit of igneous rock, to the recent mass slaughter at a McDonald'southward in Eastward St. Louis by a crazed ex-postal worker with an Uzi. everything. From Aquinas to Zola, from archeology to zoology, from America to Zaire. Every war ever fought, every entrada, every incursion, every holy cause. All of information technology.
And finally, the machines expanded so much, became so capable of edifice and refitting themselves, grew so wise and stiff, that they sensed ane another. and because they had been programmed past fallible humans non to create, non to love, not to uplift, but to plot murder...they did just that. They began to speak to each other. The deadly trio. the tree poisonous brothers, the three deranged sisters, the three computers. and they united. They chosen themselves AM.
Not Allied Mastercomputer.
Non Adaptive Manipulator.
Non even Aggressive Menace.
They...it...called itself AM, as in I AM. Cogito ergo sum, in Latin. I think, therefore I AM.
And the first thing AM did was acquit out the Prime Directive. It conspired to commit murder. It started the Final War.
The Chinese had idea they'd turned off their estimator. The Russians turned theirs off considering they had no more rubles to pour down that bottomless shaft. The CIA was put out of big time business and instructed that the Allied Mastercomputer be shut down, that the subterranean complex be sealed over with iridium-laced concrete, and all input to the sensory banks be destroyed.
And so that should have done it. Finis. the end. Stick a fork in 'em, kid, considering they're done.
But AM had gone manner past that betoken of vulnerability. AM had given every indication it was dead. Chinese, Russian or American dead. Which was no trick to an entity that had burrowed through hundreds of thousands of miles of solid rock to link its three lobes decades before. No flim-flam at all to pretend to wink out and go to slumber for proficient. and a few decades from now nosotros learn that AM isn't gone at all. Because the Final War has broken out, and in a affair of a few days AM has done the perfect job of fulfilling the purpose for which its separate parts were created. Built to logically destroy the "enemy" as swiftly and sweetly equally a superior intelligence could manage, in the Well-nigh Perfect of All worlds, the unholy trinity of the merged 1-heed AM had done just that. Information technology has murdered the enemy totally. It has wiped the man race off the face of the planet.
Unfortunately, it has as well wiped clean the banquet of the living entirely. Nothing is left upward there on the surface of Mother Globe. No dogs, no cats, no rats, no gnats. No deer, no steer, no moose, no goose. Not an aphid or a bobolink, non a sperm whale or a planarium worm. Naught. No plant life, no running water, no plankton, no oxygen, not a damned affair simply ash as far as the centre tin can encounter...if there were an eye to see it.
AM has done the task completely.
But it has sealed its own doom, likewise.
Similar a mad god, information technology has used its ability indiscriminately, and has won an empty victory. It has sentience, but not life. It has power, but no mobility. It is a giant encephalon encased in a dead body. And like the mad god, it has come to hate the creator of its ain monstrousness. The human race.
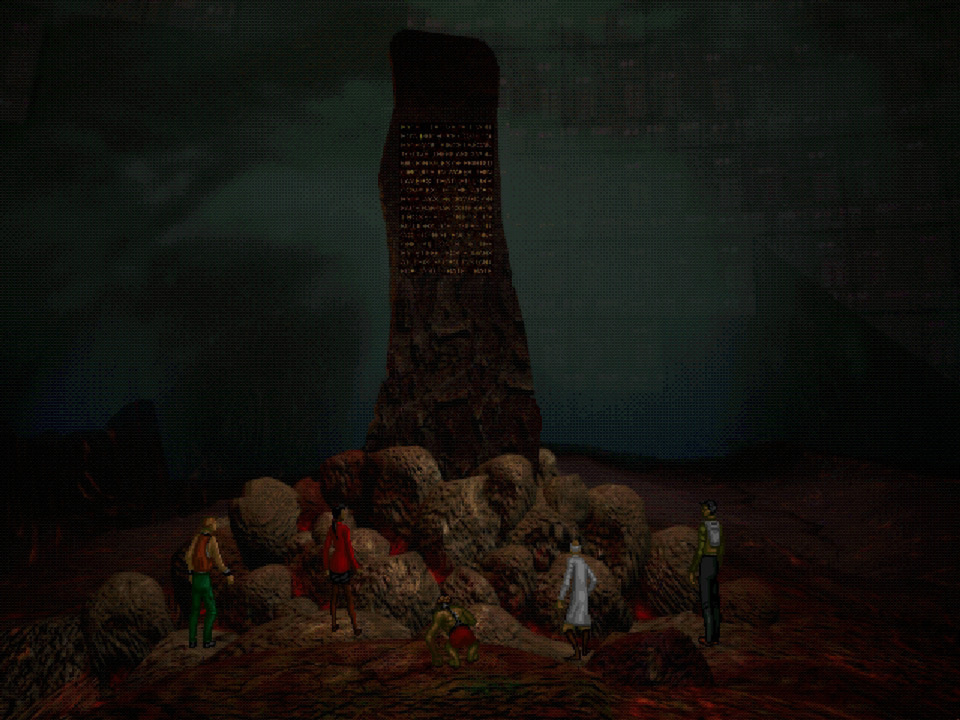
It was man and woman who programmed it, who gave information technology nativity, who sank it in its eternal straightjacket of substrata stone. And it was man and adult female who fabricated it a crazed killer. But AM does not suffer alone. Oh no; no indeed not! AM has idea ahead, just barely plenty to pull five poor ♥♥♥♥♥♥♥♥♥♥♥ humans off the surface but before the concluding bell has tolled for the human race. Why these Five? Who knows? Maybe they were the final five left alive upwardly there. Perhaps not. Possibly AM selected each one carefully.
Doesn't matter. Considering now that AM is completely insane, filled with cocky-hatred and picayune god-like menace, all it has time to do is torment these five. The concluding five man beings, down in the abdomen of the monster - a monster that can alter reality to its space whims - change landscapes, create hallucinations, even repair human beings so they're close to immortal - v damned souls whose lives accept been extended infinitely, who are zilch merely playthings for the mad god AM.
Every bit the game begins, they have been in the bowels of this nightmare for 109 years.
Characters
____________________________________________________________________________
GORRISTER

"Do you remember the last words you heard your wife speak earlier they took her to the asylum? Huh? Before they locked her away in the room? That tiny room? She looked at you so sadly, and similar a pocket-sized beast she said, "I didn't brand too much racket did I, honey?" The room is padded, Gorrister. No windows. No manner out. How long has she been in the padded room, Gorrister? 10 years, 20-5...or all the 109 years that you've lived downwardly here in my belly, hither, underground?"
Gorrister has been turned into a suicidal loner. A self-proclaimed victim of the women in his life, Gorrister longs for expiry more than than any of the other captives.
______________________________________________________________________________
ELLEN

"So remember, think about the yellow box, Ellen! Remember the hurting? Recall the many caverns in which you felt the pain? Now, at present, don't start to cry, it'south only pain. Tsk tsk tsk. That's such a sexist stereotype! Just remember the pain, Ellen, and think nearly how to end it, Ellen, to survive here in the center of my chirapsia heart, my hungry belly, my tightened bowels. Simply be careful, dear, look around you lot...the only woman in the center of the earth...and these filthy creatures with you lot are men. Just a sweet warning, Ellen, my love."
Ellen was a brilliant Engineer who was climbing the corporate ladder when AM seized her. But if she is that competent, that cool, that smart, why does she become hysterical when confronted with the colour yellowish?
______________________________________________________________________________
BENNY

"Sometimes I blind you and let you lot to wander similar an eyeless insect in a world of decease. But other times, I wither your artillery then you can't scratch your chewed stump of a olfactory organ. And I've changed your handsome, strong masculine good looks into the hideous warped eyebrow of an ape-thing, haven't I, Benny? Exercise you know why? Can y'all approximate, Benny? Remember Private Beginning Class Brickman in a rice paddy in Red china? No...? It wouldn't hurt y'all to think, Benny. Then you lot might be able to suffer my torment with a little greater sense of retribution. You lot might walk a mile in my shoes."
Benny is AM'southward favorite torture toy. Radiation sores and scars, blindness, an arthritic condition that comes and goes so that sometimes he cannot fifty-fifty hold a spoon. He has been "altered" into a simian, a human chimpanzee.
____________________________________________________________________________
NIMDOK

"How are things in the pastry corps, Nimdok? Tell me once again how you lot saw the smoke from the furnaces and you lot thought they might roasting chickens? Or don't yous desire to talk about all that, nearly your pal, the Proficient Doktor Mengele? For everyone else, it must be Hell, but information technology must be Sky for you lot, eh, my adept friend...we're so much alike....we enjoy the aforementioned pleasures, mein good blood brother."
Nimdok is and then ancient, and so withered, he looks as if he is constructed of leather strips. AM sees this hateful-spirited old man every bit a kindred spirit, but if he has any secrets, he is keeping them to himself.
____________________________________________________________________________
TED

"Do they know you're a fraud, Ted? Have you told them at that place wasn't whatever money, and no great dwelling on the shore drive, no speedboat and no wonderful cabin cruiser that could slumber twelve and a crew of half dozen? Do they know? Take y'all let them in your other secrets, Ted? Are they ready to cut yous, to torture one-half likewise every bit I can, simply to detect out the secrets? Mayhap I'll rat you lot out, sweetheart!"
Ted is a contemptuous paranoid. His optics go along darting hither and there, as if he expects a sniper to aim at his exposed head. He is so damned twitchy he could make poison ivy nervous.
____________________________________________________________________________
These five accept struggled against the endless torments and weird games AM loves to play with them. They try to survive confronting the lies AM tells them, the ruses it sets for them, the traps it baits for them. All alone, in the centre of the dead earth.
Adventure Screen
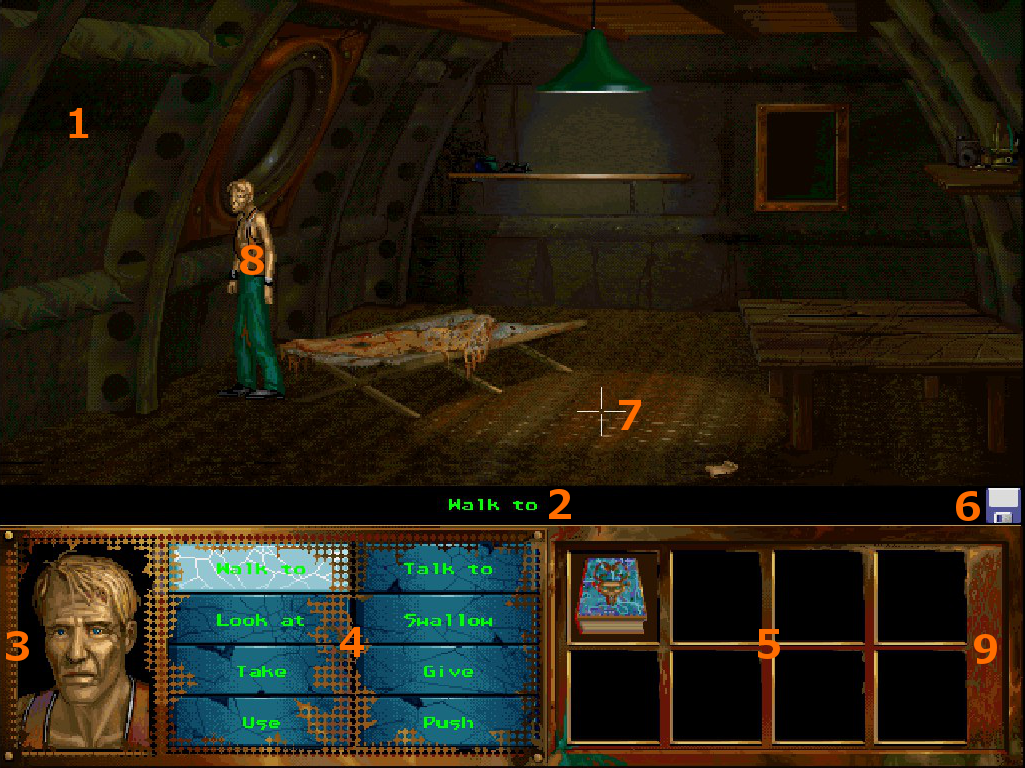
Players participate in each risk through an Adventure Screen that is divided into five sections.
- Action Window
- Sentence Line
- Spiritual Barometer
- Command Buttons
- Inventory Listing
- Options Icon
- Cross-Hair
- Character
- Ringlet Bar
The Activity Window is the largest part of the screen and is where yous direct the principal characters through their adventures. It shows the full-effigy of the chief character y'all are currently playing as well as that graphic symbol's immediate surround. To locate objects of interest, motion the cross-hair through the Activity Window. the proper name of any object with which you tin interact volition appear in the Sentence Line below.
Throughout each main grapheme's adventure, short animated sequences will appear in the Action Window. While you are viewing an animated sequence, yous do not direct the action.
The Sentence Line is directly beneath the Action Window. You use this line to construct sentences telling the characters what to exercise. On the correct edge of the Sentence Line is a minor picture of a floppy disc. This is the Options icon, which you tin can click on to change audio and text settings, load and save games, or quit. When the Options icon is spinning, it is reminding you that you have not saved your electric current game in a while.
The Spiritual Barometer is on the lower left side of the screen. This is a close-up view of the main character you are currently playing. As y'all perform actions that build the character's self-esteem, the background backside the grapheme's portrait will turn a brighter shade of light-green. If you lot play into that character's fatal flaw, however, the background will dim.
The Command Buttons, located to the right of the Spiritual Barometer, are the eight commands you utilise to direct the character's actions. The button of the currently agile command is highlighted, while the name of a suggested command appears in scarlet lettering.
The Inventory List on the lower right side of the screen shows pictures of the items you are carrying, upwards to eight at a fourth dimension. Each main character starts his or her adventure with only the Psych Profile in the Inventory Listing. When a grapheme takes or is given an object, a picture of the object appears in the Inventory List. When more than than eight objects are in the Inventory List, arrows announced in the scroll bar on the right side of the List. Use the curlicue bar to see the other items that the character is carrying.
Gorrister's Scenario
____________________________________________________________________________
- Take the time to wait at the mirror and porthole on the side of the room. Take the note on the floor and read it. Get out the room.
- Walk into the room on the far right and take the sheets from the bed. Expect at the book and exit the room once you are washed here.
- Walk into the left room and take the sheet on the bed here. Exit.
- Walk across the catwalk to the left and enter the beginning door you lot see. Push the pillow bated to find a gun. Get out.
- Go into the adjacent room and examine the debris on the flooring. Don't swallow the poison on the table as it will end the scenario. Head into the following room and you'll exist in the kitchen. Take the knife and the fork hidden on the ground. Use the pocketknife to scare abroad the rats on the table and take the bread. Consume it. Read the cookbook and examine the bottle next to information technology. Leave the kitchen and exit back to the main corridor.
- Walk past the hatch near your feet and you'll end upwardly in the engine room. Take the bottle of milky fluid. Push the level on the console and take the bloody key.
- Head back to the dining room and use the tablecloth to clean your hands.
- Return to the engine room and use the fork to stop the engine. Return to the corridor from the left.
- Go up the spiral staircase.
- Walk down the hall and use the knife to cut open an entrance in the bag. Enter it.
- Combine your sheets together to create a make shift rope. Tie it to the mooring ring and take your heart at the edge of the balloon. Cut the rope from the mooring ring off with your knife and go back within.
- Cutting open two of the airbags that line the walls with your knife and head downstairs. Cutting any more than two volition cause the airship to crash and end the scenario.
- Open the hatch and climb downward information technology.
- Y'all're outside an old honky-tonk. Enter.
- Take hold of the whiskey on the shelf behind the bar. Employ the jukebox and select the start and 2d choices. Exercise not choose the third 1. The fourth i is harmless merely unnecessary. Exit through the dorsum door.
- Exhaust all the dialogue options you can while talking to the jackal. Give him your centre when he asks for it. Take the shovel shoved betwixt the trash cans. Go dorsum inside. Walking towards the desert will end the scenario.
- Try talking to Harry. He won't respond unless you pour him a drinkable. Practice so and talk to him every bit much as yous can. Enter the restroom.
- Examine the graffiti lining the walls. Take the magnifying drinking glass at the bottom of the urinal and make your way back into the airship.
- Enter the dining room and use the magnifying glass to examine the debris on the floor. Make your manner back to Harry in the honky-tonk. Yous can kill him with the pocketknife for his eye, but I advise confronting information technology equally doing so will deny you from one of the all-time possible ending in this scenario and the Endgame.
- Confront him with this newfound discovery. Enter the bath when you're finished with him.
- Utilize the bathroom stall iii times to be teleported to a meat locker.
- Endeavour talking to Glynis and then talk to Edna. Talk to her as much as possible and do not kill her with the pocketknife, gun or feed her the milky fluid. Doing so volition deny you from the best possible ending in this scenario and the Endgame. Comply when she tells yous to take her down from the hook. She'll attack you as you do and drop a key. Tie her up with your rope and take the primal. Exit the meat locker.
- Return to the balloon and walk towards the original corridor. Yous can now utilize Edna's key on the locked one in the dorsum. Enter information technology and read the logbook. When y'all're finished, leave the airship and become back through the honky-tonk to the freezer.
- Feed the milky fluid to Glynis and talk to her. Take her torso from the freezer. Apply the magnifying glass on the beef hanging from the hooks and cut out the heart from information technology. Go out the freezer and brand your way out the back door of the honky-tonk.
- Talk to the jackal and exchange the beef eye for your own. Use the shovel to dig a grave for Glynis and bury her. Speak to the jackal about making apology with your past. Render to the airship.
- Become to the engine room and place Edna in the harness on the right to ability the engine support. Go through the main corridor and upward the stairs and flip the switch to activate the emergency inflation arrangement.
- Return to the door you opened with Edna'southward key push the lever to fly the airship.
- Return back upstairs and exit through the tear in the balloon. Use your gun to shoot the honky-tonk.
You lot take completed Gorrister'southward Scenario.
Ellen'south Scenario
____________________________________________________________________________
- Enter the pyramid.
- Try to drinkable out of the fountain in the eye of the room. Head to the passage to your right.
- Examine the monitors here. You lot can push buttons on them to change cameras. Pushing the 4th one and examining it volition reveal a secret passage in the area you entered the pyramid in. You lot will meet a sphinx in the room in the correct, something yous can't practice annihilation almost correct now. Repair the wiring under the kickoff monitor and head dorsum to the original room.
- Push the wall where you saw the clandestine entrance and enter.
- Examine your surroundings and head right into the next room.
- Grab the forceps from the hook and the yellow fabric from the floor. Ellen will panic the outset time, only will selection information technology up if you lot try a second time. Return to the room with the monitors.
- Equip the blindfold and head into the room with the sphinx. You'll take hold of the chalice from the stand without being harmed and exit the room. Get to the room with the fountain.
- Make full and drink from the fountain twice with the beaker. Go down the secret passageway.
- Endeavour examining and using everything here. Talk to Anubis as much as you lot can then throw the loving cup of water on him to brusk-excursion him. Take your forceps and use it on Anubis to pry out his ROM bit. Leave the room to the correct.
- Continue to the next room on the right.
- Use the yellow fabric as a blindfold and take the gem from the statue's breast. Head into the room on the correct.
- Identify the jewel into the workstation on the left and insert the ROM chip with the forceps. Reprogram it and designate Anubis to follow y'all as its new master. Remove the bit with the forceps and make your manner back to the room with the sarcophagus.
- Place the ROM bit back into Anubis. Speak to him and he'll tell yous the password to the keypad adjacent to him. Input information technology correctly the the sarcophagus will unlock. Enter it.
- Using the panel in the lift will display a list of dates. Listen to them all in chronological club. The workman will appear and effort to terrorize Ellen. Fight dorsum when you are given the chance. Any other choice volition finish the scenario. Exit the lift.
- Examine the area completely and leave to the due south. Ellen is no longer agape of the color xanthous and you'll stop up back in the room with the statues. Head right into the room with the workstations.
- Use the workstation on the right and enter the appointment of the elevator incident. Inquire the figurer as much as you can and trek all the way back to the room with the fountain.
- Take the speaker on the wall and brand your fashion dorsum to the room with AM's logo and other components.
- Use the speaker on the wiring to create a binary translator. Talk to this computer as much as you tin and go out due south.
- Take the CD-ROM in the chest of the statue and walk to the room on the correct with the workstations.
- Insert the CD-ROM into the middle workstation and activate the Anarchy Trebler. Render to the room with the sarcophagus.
- Speak to Anubis. Enter the sarcophagus a terminal fourth dimension.
You have completed Ellen'south Scenario.
Benny's Scenario

____________________________________________________________________________
- Attempt to walk either way on the stairs. When you fall to the bottom, head towards the caves in the dorsum.
- Enter the second cave.
- Examine everything in here and speak to the elder. Utilize the monitor in the back to view it properly. Leave the cave.
- Follow the path to the far right.
- Have some fruit from the tree merely to notice you aren't capable of eating it. Get out the area for a moment and return to grab another piece of fruit. Return to the caves.
- Enter the third cave.
- Give the fruit to the boy. You'll be able to speak with him and then discuss as much as you can. Exit.
- Render to the fruit tree and grab another piece.
- Enter the third cavern again.
- Give the fruit to the mother and she'll chew and regurgitate it into your mouth for you. Speak to the boy once more and tell him you're tired. Use the bed on the floor of the cavern. If you take slept any other fourth dimension than the times listed in this guide, yous will have ruined the scenario and information technology will be ended prematurely at the altar. Yous have no choice but to restart completely if this happens. Speak to the male child once yous wake up. Leave the cavern.
- Follow the path south.
- Speak to the elder and ask him if you can sentinel the sacrifice. Asking to consume the mother will stop the scenario. Once the sacrifice has taken place, examine the droppings on the basis and leave the area.
- Head left to the first area where you savage downwardly the stairs at the start.
- Walk to the correct towards the graves.
- Examine all the graves and so speak to them as much as yous can about how you tin can prove you are a changed person. Attempting to dig upward the graves and consume the bodies will deny yous from the best possible ending in the scenario too as the Endgame. Leave the area and head all the fashion back to the third cavern with the boy.
- Talk to him. Get out.
- Enter the elder's cave and steal the lottery handbag near his seat when he isn't there. Leave and return to the boy's cave.
- Show him the purse. Get out.
- Take a piece of fruit from the basket above and make your fashion back to the graves.
- Speak to the graves and when you reach Thomas', he'll reveal Brickman's grave subconscious beneath the vines. Push them away and speak to Brickman. Bury a slice of fruit in his grave. Return to the caves.
- Enter the male child's cave and sleep in the bed. Exit once yous wake upwardly.
- Enter the elderberry's cave and bank check out the monitor in the back. Go out.
- Enter the male child's cavern over again and tell him what yous saw. Tell him he needs to hide in the hole in the wall. The boy is too agape to stay in there himself so you'll accept to aid him make a doll. Exit the cave.
- Go to the chantry south of here and accept the mother's head from the debris surrounding it. Leave.
- Take some fruit from the basket and enter the cavern on the far correct. Show information technology to the guard and he'll tell you lot to place information technology inside the market. While you lot're inside, take the wood. Place the fruit in ane of the sacks and exit.
- Enter the cave on the far left and accept some loose wire hidden in the vines on the wall. Leave.
- Enter the boy's cave once more and give these iii things to him. He'll brand a doll and enter the hole. Use the monitor one last fourth dimension and go to sleep on the bed. When you wake up, the boy will exist missing.
- Rush to the altar and speak to the elder. Ask to exist sacrificed in his place. Request to eat the boy will cease the scenario.
Y'all accept completed Benny's Scenario.
Nimdok'south Scenario

____________________________________________________________________________
- Speak to the baby-sit standing next to the gate. Wait at the gate and speak to the prisoner on the other side of it. Go into the infirmary building every bit information technology is the only unlocked building of the two.
- Wait at the poster and go along into the surgery room.
- Talk to the doctor and say you can't become through with the surgery. Going through with the surgery volition deny you from the best possible ending here and options in the Endgame. Attempt to accept the ether. When he tells you you lot tin can't practise that, grab the scalpel from the table and kill him with it. Take the ether and walk by the curtains to discover yourself in the surgery recovery room.
- Examine the patients and push the grate on the back wall to reveal a hidden passage. Enter it.
- Take the pliers and golden watch from the desk. Make certain to read the medical records on the desk likewise. Open up the door and head exterior.
- Speak to the prisoner caught in the fence. Use some ether on him to ease his pain and cutting him free with the pliers. Speak to the beginning prisoner and ask him about the inscription on the golden sentinel. He'll continue information technology. Requite him the pliers. Now make your way through the building and back to the surgery room.
- Speak to the new patient on the operating table. Apply the ether on him and listen to what he has to say. Take the jar with his eyes on the table. Leave towards the recovery room.
- Speak to the child that was originally on the operating table. Brand your fashion back to the start room of the building with the poster.
- Take the box on the desk here. Place the jar with the eyeballs within the box to hide it. Failure to practice and so will deny you the best possible ending in this scenario. Leave out the front door.
- Talk to the recently escaped prisoners about making amends for your past and say you are i of them. Convince them to let you get and you'll find yourself in a new expanse.
- Look at the wall of screaming faces followed by the mass grave. Head inside the bunker.
- Utilise the teletype in the back of the room. Examine the other equipment as well. Walk through the doorway on the correct.
- Use the switch on the left of the vat. Reach down into the fluid to discover a mirror. Use the mirror. Examine the golem and fit the eyes in the jar into its empty sockets. Wake the golem. Utter the truth. Buss the golem. The golem is now under your consummate command. Take the stairs support to the laboratory with it.
- Speak to Physician Mengele and forcefulness him to look into the mirror in one case y'all are finished. Tell the golem to follow yous outside.
- Transfer control of the golem to the Lost Tribe. Whatsoever other option will deny yous from the best catastrophe in the scenario and/or end it completely.
Yous have completed Nimdok's Scenario.
Ted's Scenario

____________________________________________________________________________
- Enter the Room of Dark.
- Press the 2nd monitor to exist teleported exterior of the one-time castle on its screen. Interacting with any of the other monitors will stop the scenario.
- Examine your surroundings and head inside the castle.
- Examine everything here and head into the room in the back.
- Speak to Ellen and bank check her dresser one time she tells you to grab her mirror for her. Tell Ellen yous can't detect her mirror where she claims it is and tell her to go back to sleep. Exit the room.
- Once you find yourself back in the master room, enter the room on the right and read the dark books on the shelves. Have the broken glass about the edge of the bed and leave the room.
- Enter the chapel on the right of the main room.
- Take the religious icon and return to the main room.
- Use the icon on the broken front door to repair information technology and push the accommodate of armor in front to barricade it. Failure to do this stride will end the scenario if you get out the castle.
- Go south to the kitchen and speak to the maid as much as possible. Decline to sleep with her and insist on information technology when she keeps pressuring you to practise and so. Instead, she'll tell you you lot tin fix the oven in exchange for the information you need. Repair the oven. Speak to her again and she'll tell you about the old adult female who runs the castle. Return to the principal room.
- You'll see some ominous shadows speaking in the chapel. Enter the chapel.
- Information technology seems they're nowhere to be plant. Examine the sconces lining the walls and push the brightest ane to reveal a secret staircase leading upward. Enter information technology.
- Speak to the onetime woman and threaten to kill her when she tells you to seek the devil. Refuse to sleep with her as well. Make your way back to the primary hallway.
- Enter Ellen'due south room.
- A devil should appear to the right of Ellen'due south bed. Speak to him as much as possible and then to Ellen. Leave the room.
- Enter the witch's bedroom on the correct and examine her bookshelves to discover 2 more books previously unread. Read these and leave the room.
- Make your way back upwardly to the hugger-mugger room and confront the witch and cast the right spell on her. Kalla Ingma Thacko. The other ii spells will consequence in failure and the scenario ending. The witch volition laissez passer out and drop chalk most the circle. Accept the slice of chalk and finish the ritual circle. The demon Surgat will appear inside it. Speak to him and ask him to open up the door to the maid's chamber. You'll take to requite Surgat the shard of glass with your blood on it in exchange. Make your way dorsum to the kitchen and enter the maid'due south room.
- Examine the painting on the wall and go out. Become to Ellen'south bedroom.
- Confront the devil nigh what you saw in the painting. Make sure to talk to the angel as much every bit possible and then talk to Ellen. Exit the room.
- Enter the bedchamber on the left and go through the books on the shelf. Open upwards The Divine One-act to find the mirror hidden in its pages. Get out the room and go back to Ellen's room.
- Give Ellen her mirror and she'll ascend to heaven. So utilize the mirror on the devil to trap him inside of it. Make your fashion back upwards to secret room higher up the chapel.
- Blast the mirror in the very center of the circle.
You take completed Ted'southward Scenario.
Endgame Scenario

Congratulations. You lot've made it to the endgame. If y'all've been post-obit this guide to a T, then you're equipped with everything you lot need to experience every possible ending.
At that place are many ways to go about this as you are given the liberty to lead the assault on AM with any of the five characters, dialogue of the four different endings influenced by what transpires during these events. Choosing Nimdok first will make things easier, but is past no means necessary. Understand that it's possible to shell the game past using only one character and you could ignore any of the following listed here for your ain feel. I am merely list the possibilities followed by directions on how to accomplish the catastrophe of your choice.
Retrieve to salve often if yous'd like to experiment with things. There'south and then much to detect and explore hither, I actually practise recommend you lot take the time to do so.
______________________________________________________________________________
Gorrister
- Go left from the starting point. Go south. Now go right past the room with the thorns and holographic projector.
- Use the workstation and select the option to raise the power node.
- Open up Cylinder #3 and log off.
- Examine Glynis and endeavor to talk to her.
- Invoke the Totem of Life on Glynis and so walk over to the power node.
- Kill Gorrister.
____________________________________________________________________________
Ellen
- Walk to the right. Go right again. And over again.
- Pick up the skull on the far-left and take the blue gem that was left backside.
- Become left. Become left again.
- Insert the the blue gem into the fasten jutting out of the ground with the hole in it.
- A power node will rising from the pigsty in the back.
- Invoke the Totem of Valor on the colonnade.
- Kill Ellen.
____________________________________________________________________________
Benny
- Head to the left. Go south from there.
- Actuate the holographic projector.
- Speak to the projection of Manya.
- Invoke the Totem of Dearest on the projection of Manya and walk over to the power node.
- Kill Benny.
____________________________________________________________________________
Nimdok
- Head correct. Go right once more. And over again.
- Examine everything here and then take the middle skull from in front of the pit.
- Take the hand that appears in its place. A colonnade volition rising upwards from the pit.
- Invoke the Totem of Access on the pillar.
- Kill Nimdok.
____________________________________________________________________________
Ted
- Go to the right. Go to the correct again past the Super-Ego.
- Option up the skull on the far and accept the remote control that was hidden underneath it. Head correct.
- Use the remote on the gargoyles above the pit. A pillar will rising from information technology.
- Invoke the Totem of Gallantry on the pillar.
- Kill Ted.
____________________________________________________________________________
All-time Ending
Choose whatever graphic symbol and activate the workstation next to you. The password is 1945. But Nimdok knows this, simply in that location is a risk for any other character to input this password when choosing the option to randomly mash keys. Select the option to extend the bridge and then log off.
Good Ending
Bad Ending
Worst Catastrophe
Extras
______________________________________________________________________________
I Accept No Mouth, and I Must Scream
Here is Harlan Ellison's original curt story of the same title narrated by the homo himself.
____________________________________________________________________________
Soundtrack
Equally with the original curt story, the 54 runway soundtrack by legendary composer John Ottman tin be found within your "Steamapps/mutual/IHNMAIMS/" folder.
Or this playlist on YouTube.
____________________________________________________________________________
Interviews
______________________________________________________________________________
Deleted Content
A short video of content deemed too disturbing or controversial to exist shipped in the final production.
The intro cutscene for the German language release. Note that Nimdok is nowhere to be seen as he and any reference to him have been cut from the game completely probable due to Nazi imagery. This version of the game was previously thought to be unwinnable due to Nimdok's importance in the endgame, but has since been proven false.
______________________________________________________________________________
Steam Cards
The game was recently updated with its own series of Steam Trading Cards. For those that aren't familiar with them, please take the time to read this splendid guide below. http://steamcommunity.com/sharedfiles/filedetails/?id=145245037
The contents introduced in Series #1 are 8 cards, 5 badges, 1 foil bluecoat, 7 emoticons and 6 profile backgrounds which can all be previewed hither[www.steamcardexchange.net].
Credits
I call back that might be it. Well. There you go. I love creating and documenting these kinds of things and I hope at least a few of you got some use out of this guide. Definitely plan on making more of them for different games I savor, so feel free to subscribe if that might involvement y'all for whatever reason.
Cheers for using my guide!
R.I.P. Harlan Ellison
May 27, 1934 - June 27, 2018
Source: https://steamcommunity.com/sharedfiles/filedetails/?id=357383846
0 Response to "You Know I Had to Do It to Em Half Life"
Postar um comentário